Can you expalin to me how to Prim this Shelf~Cupboard~Hutch~Tray~Sconce and so on~
I just love how your pieces turn out. So I've decided to give it my best shot at showing you how...Now it is much easier for me to turn an old shelf into a beautiful Prim shelf then it is to explain how to do it but I'm going to try my best.
#1~Keep in mind that no two pieces of wood are the same. So sometimes as you begin to work on that piece you may need to make adjustments to the Sand Paper you use, to how many coats of paint to use, to how many times you might need to wipe on your Old English Dark Scratch cover, to finally rubbing out the finish.
#2~ The things you will need:
Sand paper different grains. You can buy multi grain packages of sand paper. I suggest that you start with a couple of packages or more depending on size of piece you are doing. Fold & cut each sheet of sand paper in half. Then fold each half end over end starting with a 1 1/2" fold. Cut each or rip and you will then have a stack of pieces you can hold nicely between your fingers so you have control over your sanding as well as neve waste any part of your sand paper.
Find a letter type box and put your pieces of sand paper in the different slots for easy storage & access.
FLAT Black Paint ~~Doesn't need to be an expensive Flat Black paint.
I use a Black Chalk Board color. It is cheaper to buy it by the gallon and as long as you Clean the edge of the can and seal it tight it will last a long long time.
Paint Brushes~~Of course I have 100's all sizes but in general you can go to the artist section of any craft store and buy a package with all sizes in it from 1' to just a tip. Choose horse hair if you can find them if not make sure that they are good brushes that you can clean and use forever. Always wash brushes after each use with osap and water.
Above all choose brushes that will leave little or no stroke marks on your piece. Firm but soft and no large brushes they leave stroke marks. Nothing larger then 1" wide which by the way I never use anything larger then 1/2" wide.
Old English Dark Scratch Cover.
Rubber Gloves~Thin so you can feel yourself sanding. 10 for $1 at the dollar stores.
Rags for rubbing on your Old English~I use old baby diapers or old thick T~shirts cut into 10" squares so they can be folded. My personal choice is Baby diapers for applying Old English and for rubbing finished item. Se picture below.
Ziploc Bags for storing your Old English rags. Keep them till they wear as there is lots of Old English in them.
Keep your final rubbing rag in a seperate bag as you want it dry.
Sweeper if you are working at the kitchen table or in your house so you can sweep up the dust as you go.
An old thick towel for laying on your lap to catch the sanding dust and Old English if you hold your item in your lap as you work on it as I do with small items.
#3~If you are going to work on a good surface put down news paper if you are going to work at a craft station where it doesn't matter if you make a mess then you are ready to get started.
The key to turning out a great piece is a couple of things and always remember them or you will have to start over.
#1~Figure out how the grain of the wood runs before you ever touch your sand paper to the item.
#2~ALWAYS sand with the grain of the wood from one side to the other.
Nice even strokes~reason to use small pieces of sand paper.
Of course down in the cracks and corners this is not easy but do the best you can.
NEVER USE A SANDER ON SMALL PIECES AND AVOID WHEN EVER POSSIBLE ON LARGE PIECES. SANDERS LEAVE STROKE MARKS.
#3~ALWAYS paint with the grain of the wood from one side to the other.
Of course down in the cracks and corners this is not easy but do the best you can.
Keep this in mind with primming a wood piece you are looking for rough time worn finish so nothing has to be perfect and if you mess up you can start over. But if you follow the steps you will probably never have to.. Take your time...and enjoy what you are doing this is going to be your creation you can show off to the world...Ok now that you have your work station set up, your rubber gloves on you are ready to begin.
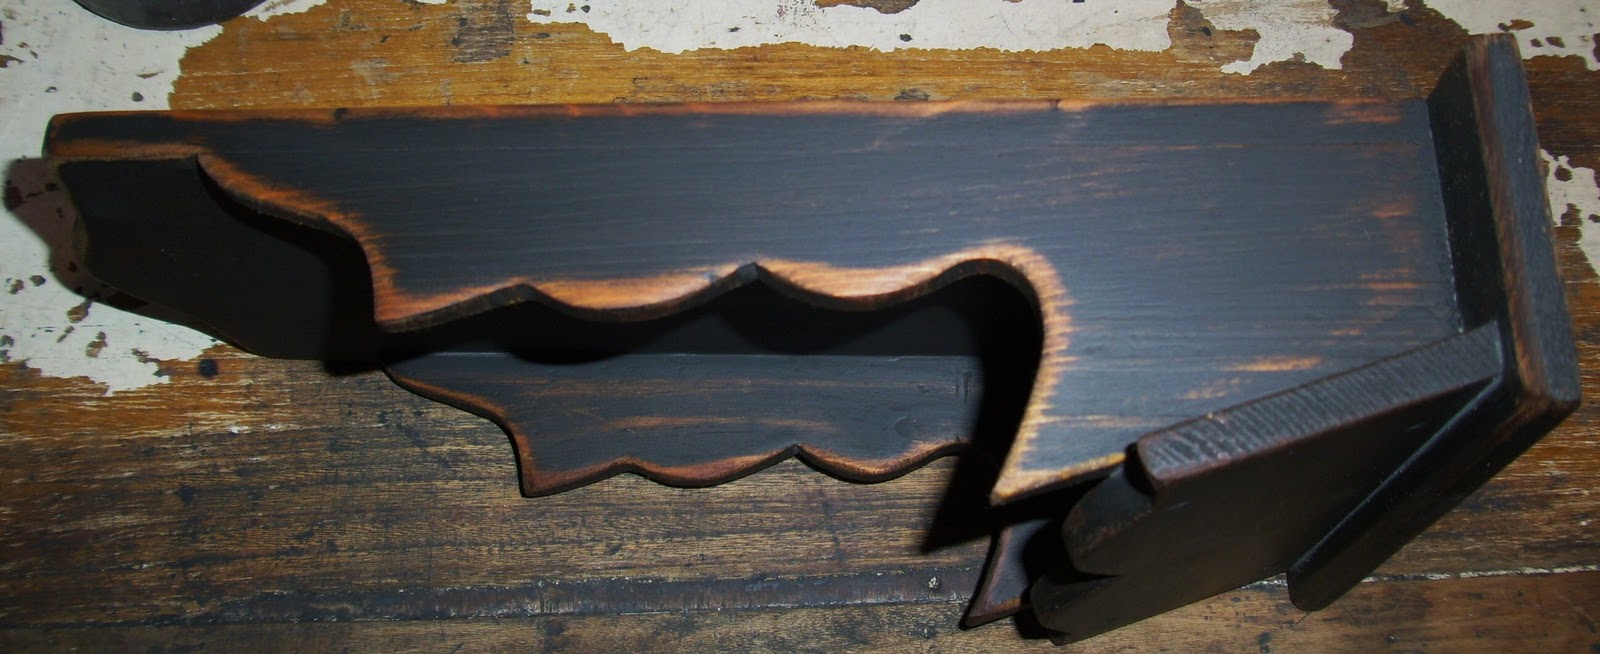
For this Tutitoral I have choosen one of the little chest I got at the Thrift store. It was unfinished made from cheap pressed wood but I sanded it just the same. If your item has some sort of stain or finish on it you will need to sand it first. I like to use 60 grain sand paper for my first sanding. Do not press hard once you have removed the finish and you are getting down to bare wood as this grain will leave stroke marks in bare wood. On all of the edges you will want to sand it down a touch further.
Sand your item Always with the grain of the wood~then wipe it down with a clean rag to remove all the dust.
Now you are ready to Paint. Generally I only put on one coat of paint. this is going to be your shoice if you are looking for a really time worn look one coat is perfect. Easy to sand to reach that time worn look.
If you aren't looking to pull out a lot of the real wood after sanding painted item then you may want to do two coats of paint. Note how very little sand strokes show and the paint is with the grain of the wood.


Letting dry~ One coat of paint evenly spread generally dries in an hour or so depending on surface of wood and room temp. If you use two coats let each coat dry with second coat drying no less then 4 hours.
If say you want to have Red as your first coat and Black as your top coat so the red shows threw do same only change first coat to color you want to show threw.
Now you are ready to do your prim Sanding and distressing. Always do your edges more then your surface. Note corners I have sanded them back just a bit more to make them look even more time worn.
Start with all the edges first. After you finish the edges then you will sand the rest of the item. ALWAYS sanding with the grain of the wood.
See size of my sand paper. I fold that 1 1/2" x 5" slice in 3rds. I use one side, then next side and then the one that was tucked under never wasting my sand paper. You can make it last a little longer if you wipe sand dust off paper every little whip stitch on the towel on your lap.


Once you have your piece sanded you will want to wipe it off removing the sand dust. Use an old T-shirt slice or old Baby diaper.
Check to see if you missed any places or if you want to make your corners or edge area more distressed looking. Sand if needed and wipe off again.
After I have done all the major sanding I generally take a very fine sand paper and sand everything one last time. This helps to get rid of any stroke marks.
This is when I clean up my sand dust with the sweeper or a wet rag depending on how much mess I made.
Now you are ready to Appy your sealing your item with Old English Dark Scratch Cover.
Put on your Gloves.

For a new rag it will take a bit to get your rag ready to use. Fold your rag into a square. Tip your old english bottle over the rag square and let it drip on your rag. You don't want your rag dripping but you do want it wet in the center of your square. When you can see it coming threw to the bottom of your folded rag you have enough.
Using an old rag that already has Old English on it you will need less to achive your goal.
Now you will want to start on the inside if it is some kind of box and work your way out making sure to cover every surface and corners with the Old English. You don't want it dripping or pooling so if you see this happening you have soaked your rag to much but not to worry you will soak it up with your polishing rag. But Old English is kinda expensive so try not to waste ..you will learn how much you need on the rag as you work.
Cover all your surfaces with the Old English and then set aside for about 2 minutes let it soak in.
If your distressed areas don't seem dark enough then apply another coat. This time sit the item aside and let dry for at least 5 minutes.


Now you are ready to Polish/Rub your item to reach that finshed look we love so much.


Showing how different types of wood look after aging and distressing


I hope this helps and you are all ready to give it a try... Start small and work your way up to those big things. The process is the same no matter the size.
If you have any questions just leave me a comment if you think my answer will benifit everyone so I can respond on the post or email me and I will get back with you.
Have a great Day!!
Blessings
Tonya


.jpg)


thanks for the tutorial...have the old english on my list now.;)you do such nice work and thanks for sharing;)
ReplyDeleteHi, Tonya
ReplyDeletethanks for the tutorial~ pretty pieces!
smiles
Teresa
I like all your pieces, they look wonderful! Thanks for sharing.
ReplyDeleteHave a good day!
Renee
Thank you Tonya! I have some pieces from the thrift store that I was so excited to find, but not sure where to start. I'm always scared to take that first step. You are right though, just start painting and sanding. We are going for 'prim' not 'perfection!' We might be going to the store this weekend for more kitchen paint, so I will keep an eye out for the Old English.
ReplyDeleteI have never tried old english.Hubby has a few times I always used stain.Going to give a try on my next project.Warm Blessings!~Amy
ReplyDeleteI've never used the Old English either. Always stain. Will give it a try!!
ReplyDeleteBlessings,
Lorna
Amy..Stain is messy, it takes forever to dry and it many times hids the natural finished look. Old English is a stain that drys within minutes and always gives you the true look of the wood.
ReplyDeleteMuch easier process with little to no mess and everything you do will look great. the best part is you can refresh your piece anytime you want..Just get out your Old English Rag and give your piece a good wiping and then Polish..always keeping the orginal look.
Tonya
Hi Tonya,
ReplyDeleteThanks for the instructions! You do such an awesome job. Have a great day.
xoxo
Terrific tutorial, I have followed your instructions and the scones turned out so perfectly prim. I need a little more practice on sanding with the grain after the piece is painted so that it will look naturally old instead of forced. Hopefully I will get the pics posted soon. Painted a wood oil lamp holder today and will sand it tomorrow.
ReplyDeleteThanks again for all your tips, I am so excited to paint and prim more items.
Connie
Can we use just black acrylic paint or house paint or does it need to be blackboard paint? I am so happy that you explained it all..Now I won't have to bug you with that 1 question..I have a lot of wood pieces (that I showed you) and have been taking things off my wall:)
ReplyDeleteFLAT Black Paint ~~Doesn't need to be an expensive Flat Black paint.
ReplyDeleteI use a Black Chalk Board COLOR.
Be sure when you have your paint mixed you check the color so it isn't a grayish Black. sometimes that happens.
Acrylic Craft paint is expensive when you are doing alot of pieces or a large piece. Buy a gallon of plain old Flat Black paint from like Wal-Mart.
Tonya
Thanks for sharing your thoughts. I truly appreciate your
ReplyDeleteefforts and I am waiting for your further write ups thank you once
again.
My web site: white board paint
It's very effortless to find out any topic on web as compared to textbooks, as I found this piece of writing at this site.
ReplyDeleteReview my web-site ... hold the cover
Howdy! This blog post couldn't be written much better! Looking through this article reminds me of my previous roommate! He continually kept preaching about this. I'll
ReplyDeletesend this article to him. Pretty sure he's going to have a good read. Thank you for sharing!
My page :: wood cutting boards
What a information of un-ambiguity and preserveness
ReplyDeleteof valuable know-how concerning unpredicted feelings.
my weblog ... http://hileshop.tk/index.php?do=/blog/792/youngster-shower-everything-they-eat-ideas/
Hello there! I know this is kinda off topic but I was wondering which blog platform
ReplyDeleteare you using for this site? I'm getting tired of Wordpress because I've had issues with hackers and I'm looking at options for another platform. I would be great if you could point me in the direction of a good platform.
Also visit my homepage white board paint
hi!,I really like your writing very much! percentage we keep up a correspondence extra
ReplyDeleteapproximately your article on AOL? I require a specialist in this space to
unravel my problem. Maybe that's you! Taking a look ahead to peer you.
my homepage ... 18 inch dishwasher
If some one needs to be updated with latest technologies after
ReplyDeletethat he must be visit this web page and be up to date everyday.
Also visit my webpage :: mind meister coupon
When some one searches for his necessary thing, therefore
ReplyDeletehe/she desires to be available that in detail, therefore that thing is maintained over here.
Look at my blog post; glider for baby